Installing the Nuki Ultra Nordics: Two Swedish ASSA Doors
A while ago I wrote about why I picked the Nuki Ultra Nordics over Yale Doorman for our Uppsala townhouse (skedjehus). The pitch was simple: a retrofit smart lock that mounts on top of the existing Assa cylinder, keeps the original keys working, requires no drilling, and supports Matter natively.
Now I've actually installed it. Twice.
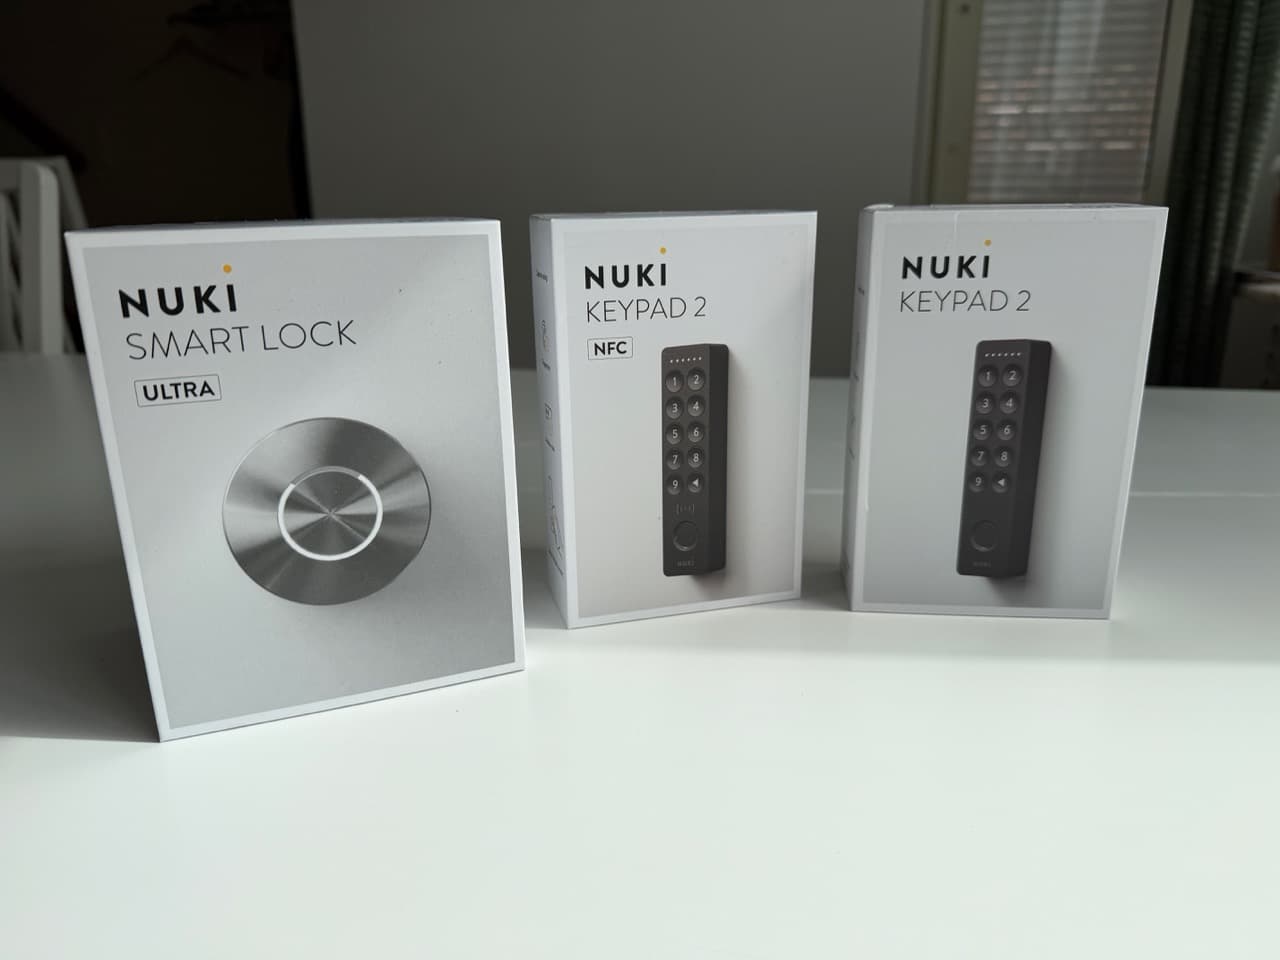
I got two Smart Lock Ultra Nordics and two Keypad 2 units (one NFC, one regular). I put one lock on our front door — the Assa 2000 that brought me to Nuki in the first place — and the other on our storage room door, a simpler single-cylinder Assa Abloy that we keep locked separately from the rest of the house. Two doors, two configurations, two very different install experiences.
Here's how both went, what surprised me, where I made mistakes, and the settings I'd recommend for each use case.
- The retrofit promise is real — both locks installed without drilling, both keep the original physical key working as a backup
- Storage room (simpler door): ~20 minutes install, calibrated to 360° rotation, locking speed set to Insane
- Front door (Assa 2000 with double cylinder + centre deadbolt): ~1.5 hours, calibrated to 720°, locking speed dropped to Standard
- NFC Keypad on the storage room, regular Keypad on the front door — NFC for owner-only Tap-to-Unlock convenience, regular for guest code access
- The mistake to avoid: don't underestimate calibration. My storage-room lock fell off the door mid-calibration because I rushed the mounting plate alignment. Lucky for me it landed on a blanket
Two Doors, Two Configurations: Why I Set Them Up Differently
Before getting into the install, the most useful thing I can share is the framework I used to decide which keypad goes where. This matters because the Keypad 2 comes in two versions and the difference is meaningful.
The Keypad 2 NFC adds Tap-to-Unlock — you can store a key in Apple Wallet (or Samsung Wallet), then unlock the door by tapping your phone or Apple Watch on the keypad. Your phone doesn't need to be unlocked. There's no app to open. It's the closest thing to a hotel-style key card experience you can get on a private home, and it uses the Aliro standard — the new industry standard for cross-platform smart lock NFC.
The regular Keypad 2 has the same fingerprint sensor and code keypad, same outdoor rating (IP54), same ~12-month AAA battery life — just no NFC. Guests don't need NFC. They need a 6-digit code that works during their stay and expires when they leave.
So we landed on:
- Front door → regular Keypad 2 (1 949 SEK / €159). This is the guest-facing entry. Codes and fingerprints cover every realistic use case. NFC wouldn't add anything for a guest who doesn't have our Wallet key.
- Storage room → Keypad 2 NFC (€179). This door is owner-only. Guests don't get access. Since I'm the only person who opens this door, I get the most value from the fastest entry method: tap my Apple Watch and walk in. No code, no fingerprint hold.

If you want Apple Home Key in Wallet, you also need a Matter hub (HomePod, HomePod mini, or Apple TV) and a fairly recent iPhone (XS+ on iOS 18.6+) or Apple Watch (Series 4+ on watchOS 11.6+). If you don't have a Matter hub, you can still use Tap-to-Unlock via "Nuki App Mode" — same tap, just routed through the Nuki app instead of Wallet.
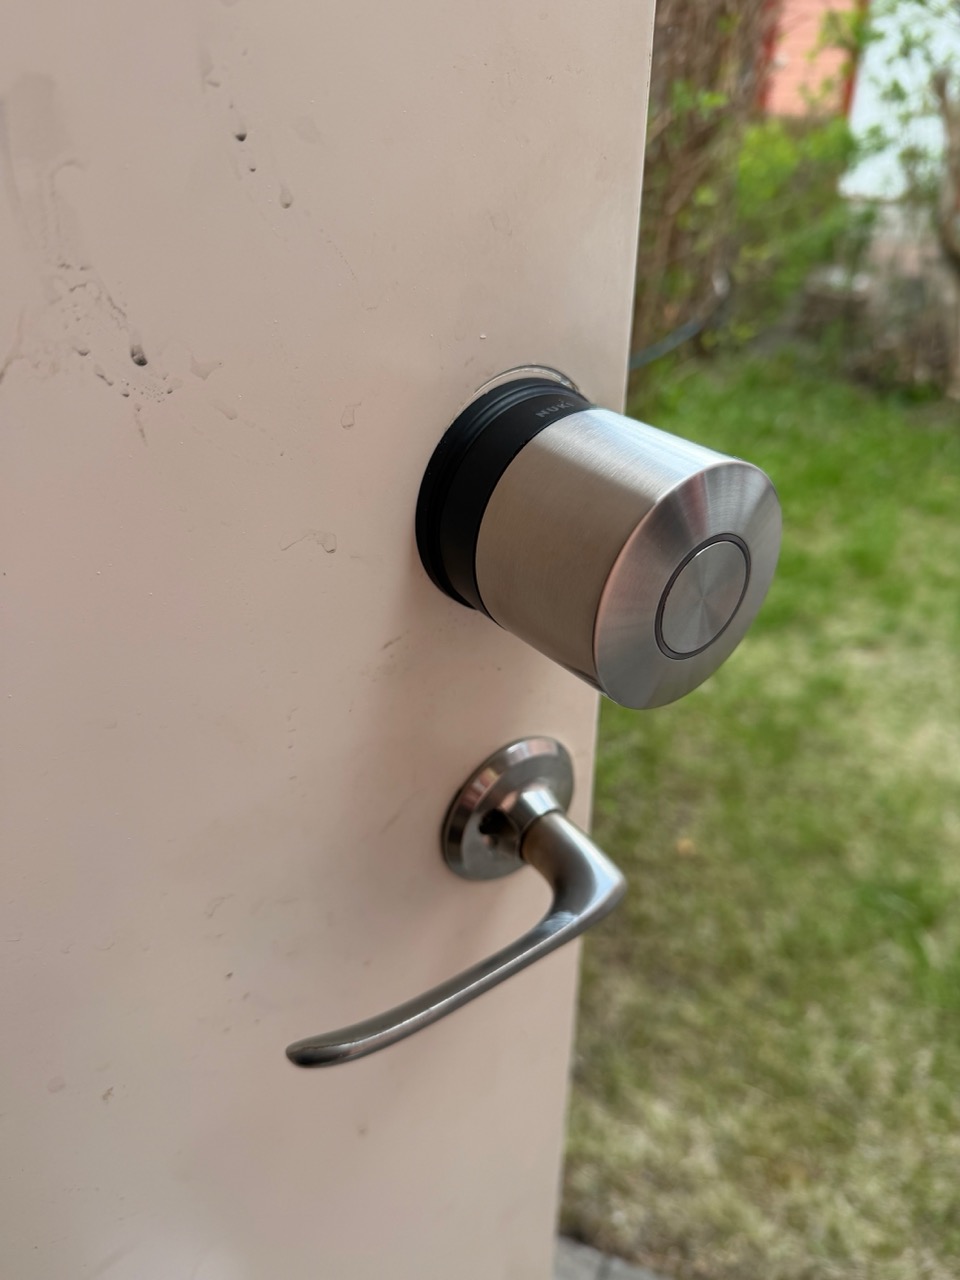
The Single Best Thing About This Lock
Before either install, the thing I want to highlight (because I underestimated how much it matters until I'd lived with it for a few weeks) is that the Nuki Ultra Nordics does not replace your existing lock mechanism. Your Assa cylinder stays. Your physical key keeps working from the outside, exactly as it did before.
This isn't a minor footnote. It means:
- No "locked out" failure mode. Battery dies, phone broken, app glitches, Wi-Fi down: the key still works
- Family members and emergency services can still enter the conventional way: no need to retrain anyone
- The install is fully reversible. Take the Nuki off, screw your original interior plate back on, and the door is exactly as it was before. No drilled holes, no replaced cylinders, nothing to explain to a future buyer
Yale Doorman replaces the entire lock and eliminates physical keys. That's a one-way decision. Nuki is additive. After actually living with it for a few months, I'd choose additive every time.
Storage Room Install: The Warm-Up (~20 Minutes)
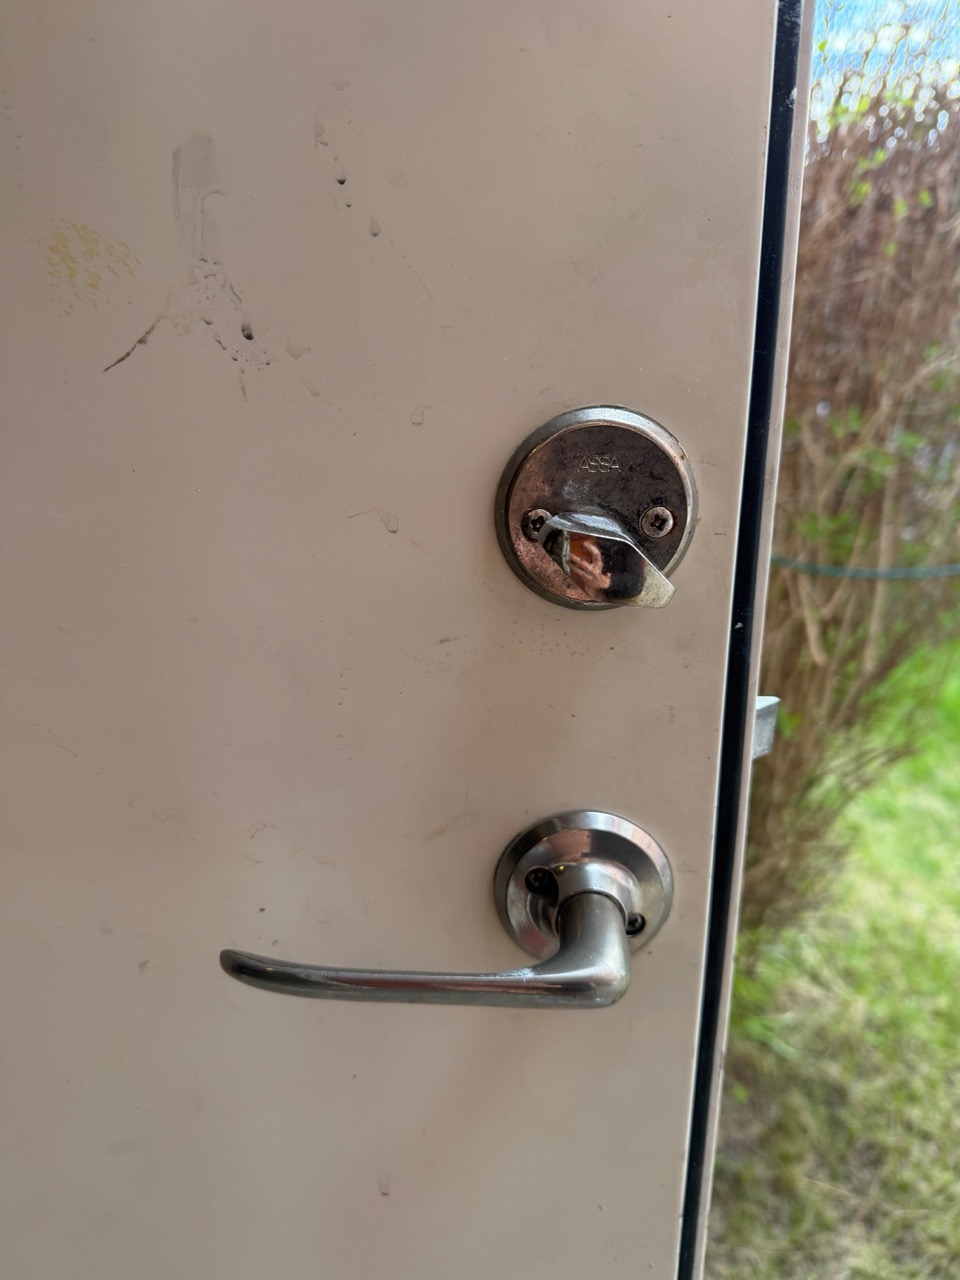
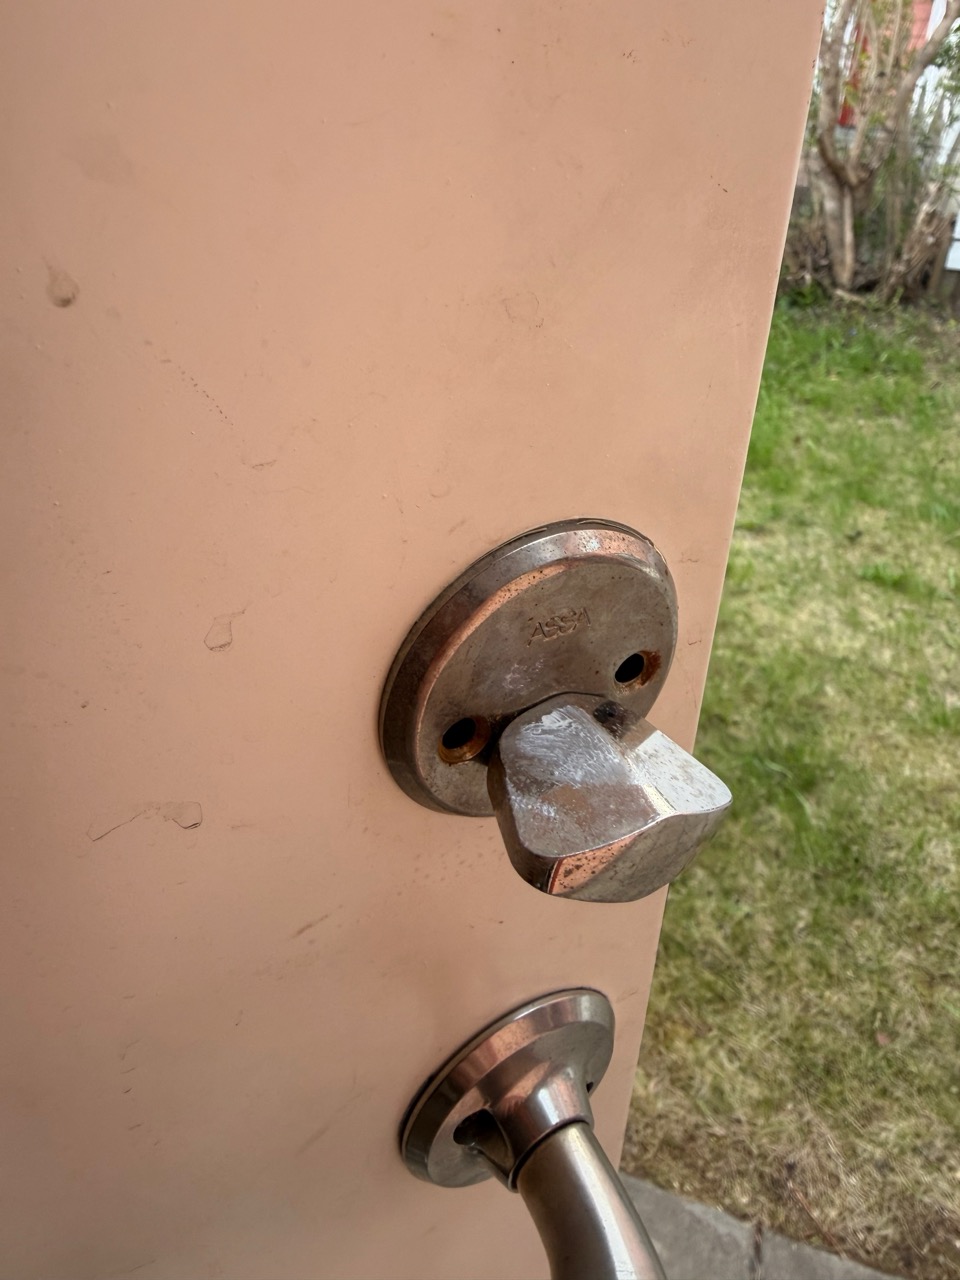
I started with the storage room because it's the simpler of the two doors. It's a standard Assa Abloy single-deadbolt: key cylinder on the outside, thumbturn (knob) on the inside, with the lever handle mechanically linked to the deadbolt. Turn the lever, the bolt retracts. That mechanical link is what makes the storage door easier to automate — once Nuki can throw the bolt, it can also open the door via the Test Open Door function in the app.
Step 1: Let the App Walk You Through It
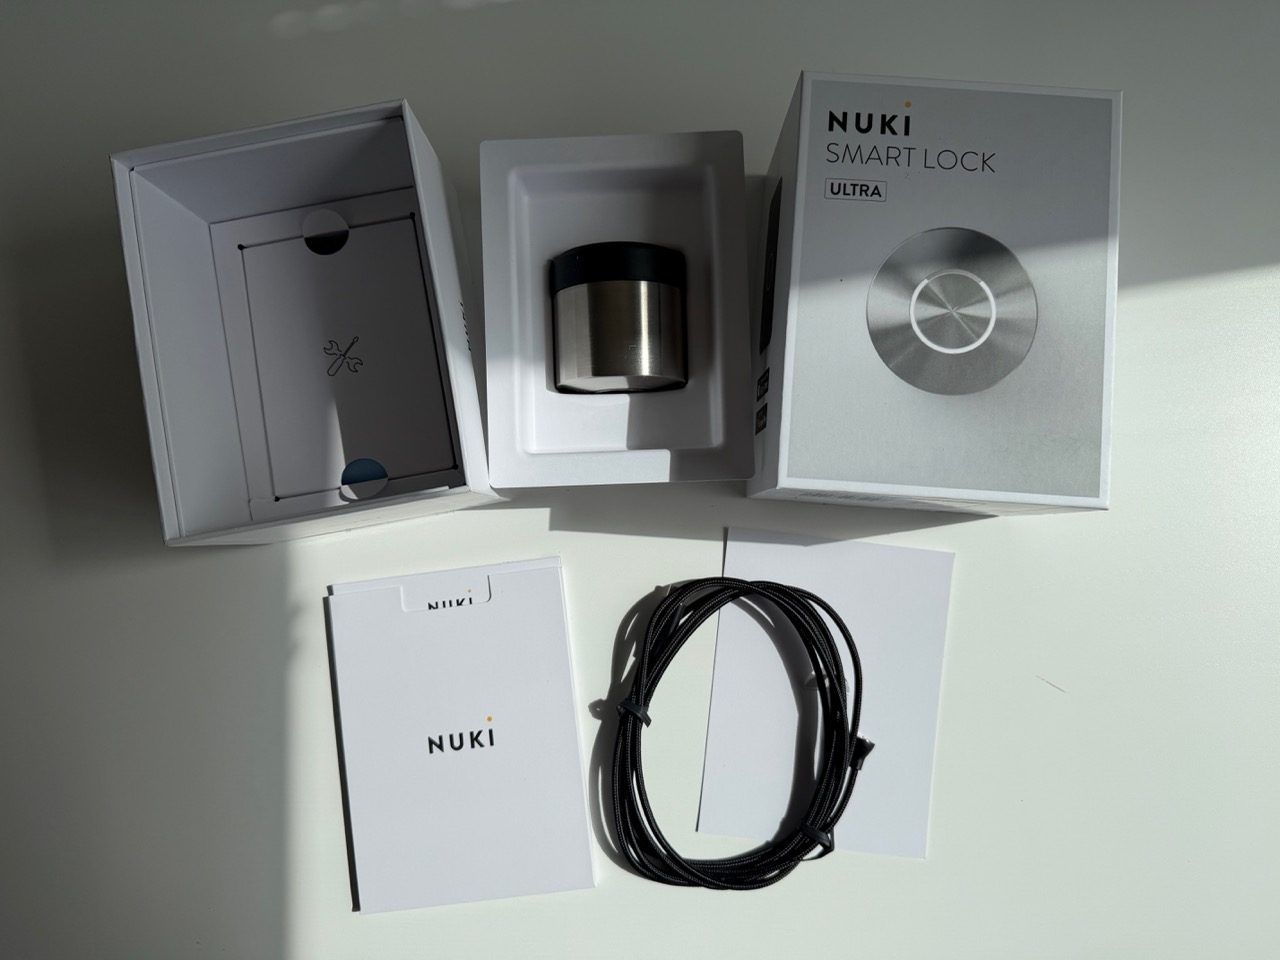
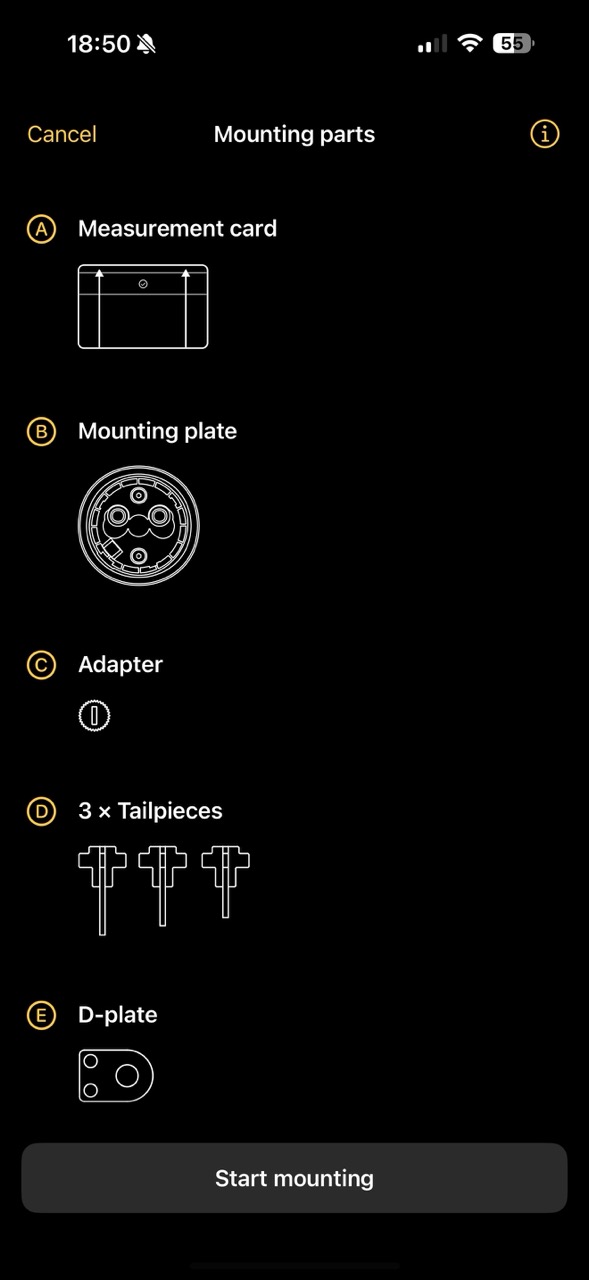
The Nuki app does an excellent job guiding you through the parts list and the install. Pull up the mounting parts screen first. The entire kit fits in one box but it helps to lay everything out:
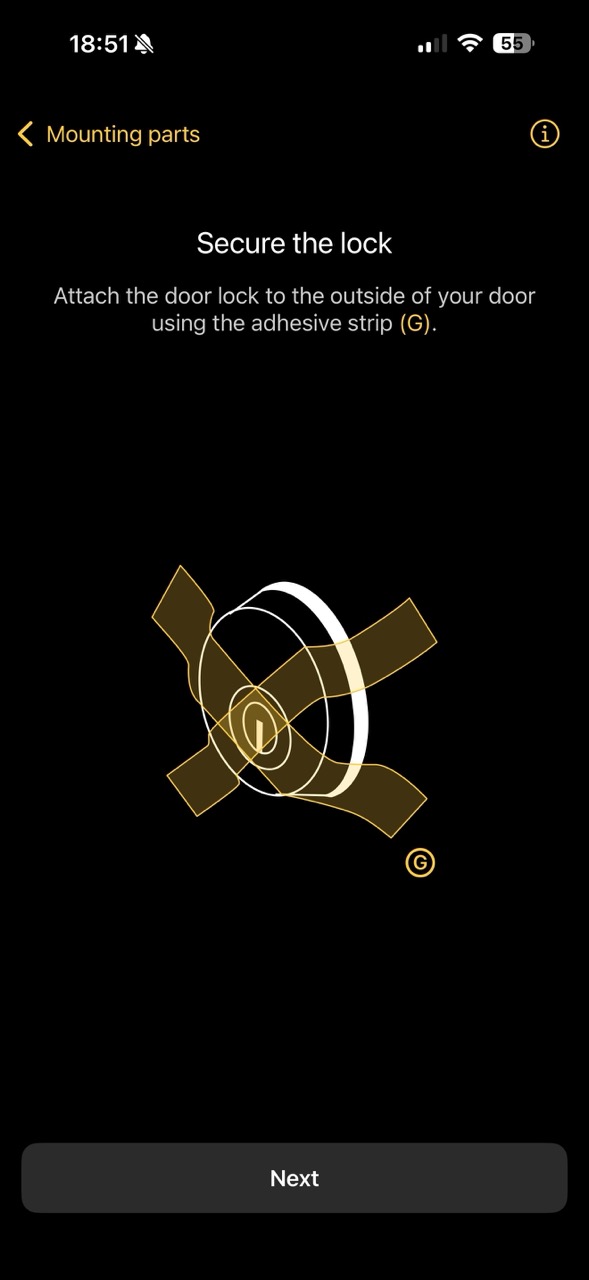
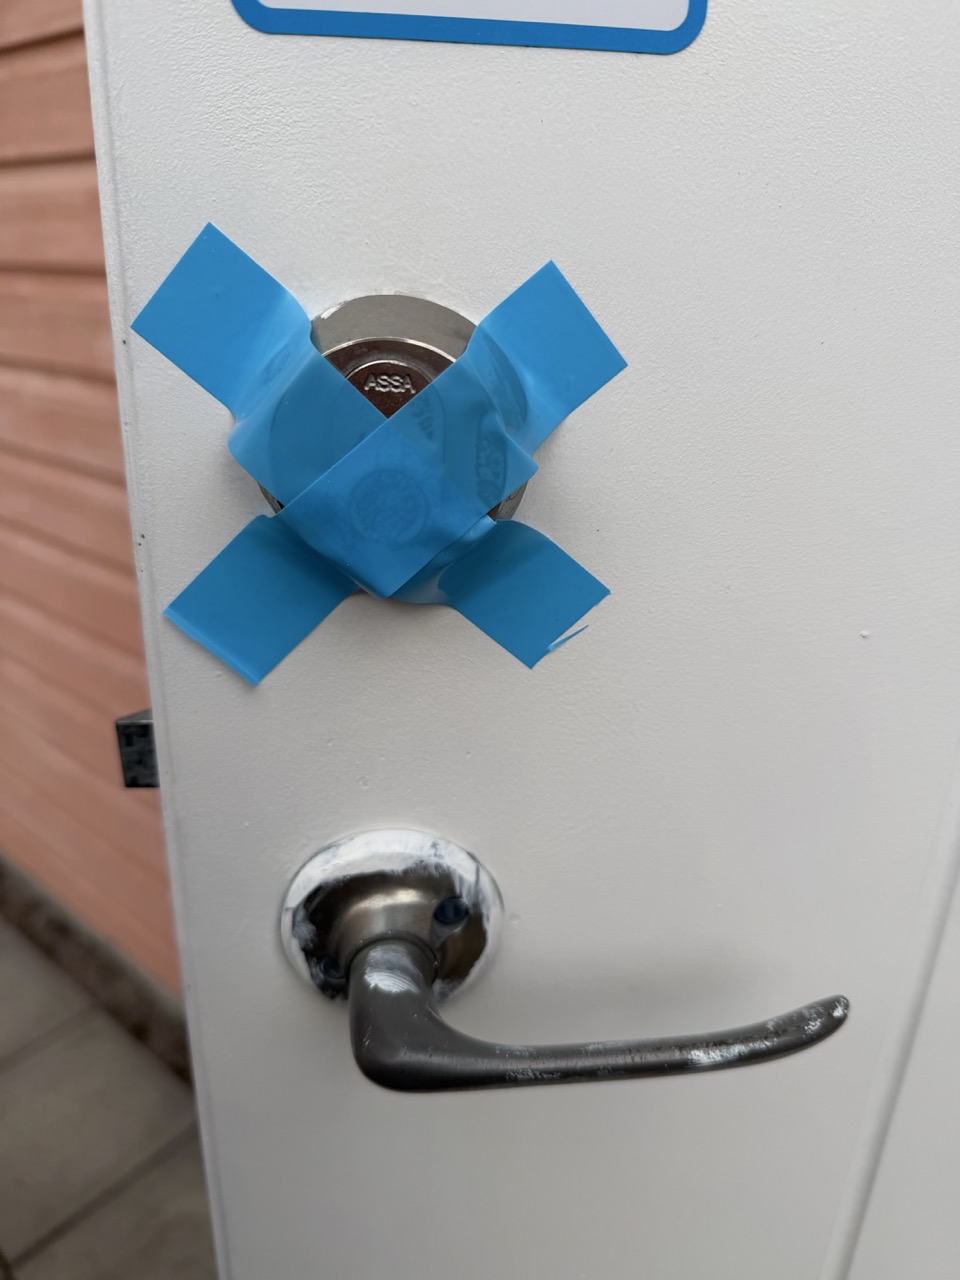
A practical tip the app glosses over: when you remove the inside knob, the cylinder can slide out the exterior side and fall on the ground. The adhesive strip Nuki provides works, but painter's tape is faster and stronger. Two strips in an X-pattern across the outside cylinder, and it's not going anywhere while you work.
Step 2: Remove the Interior Knob, Measure, Install the Tailpiece
For this door the app asks whether you lock from the inside with a key or a knob. Storage room is a knob, so the path is straightforward: unscrew the two long thru-bolts holding the knob in place, pull the knob off, and the cylinder is now exposed and removable.
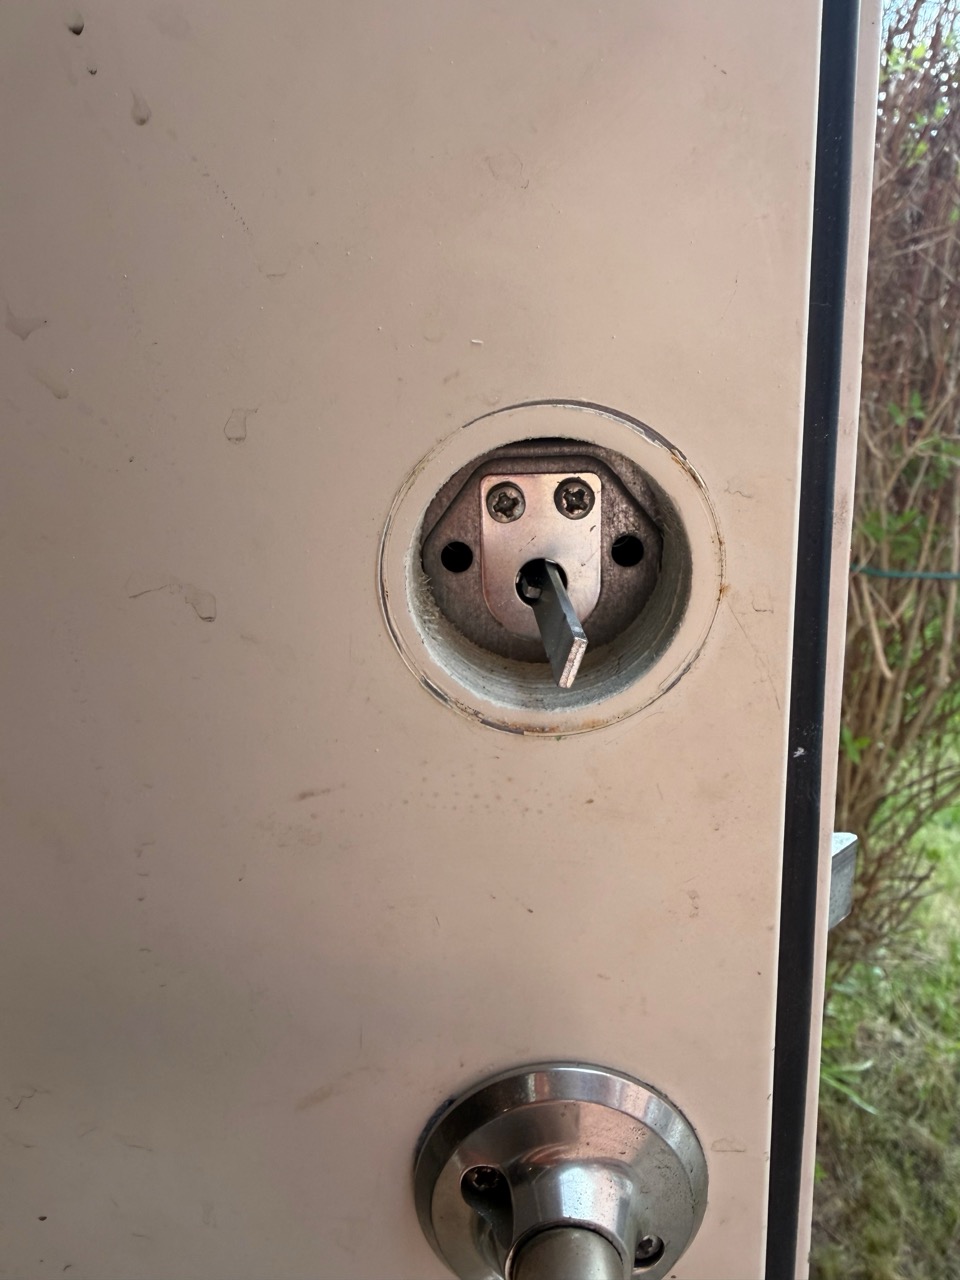
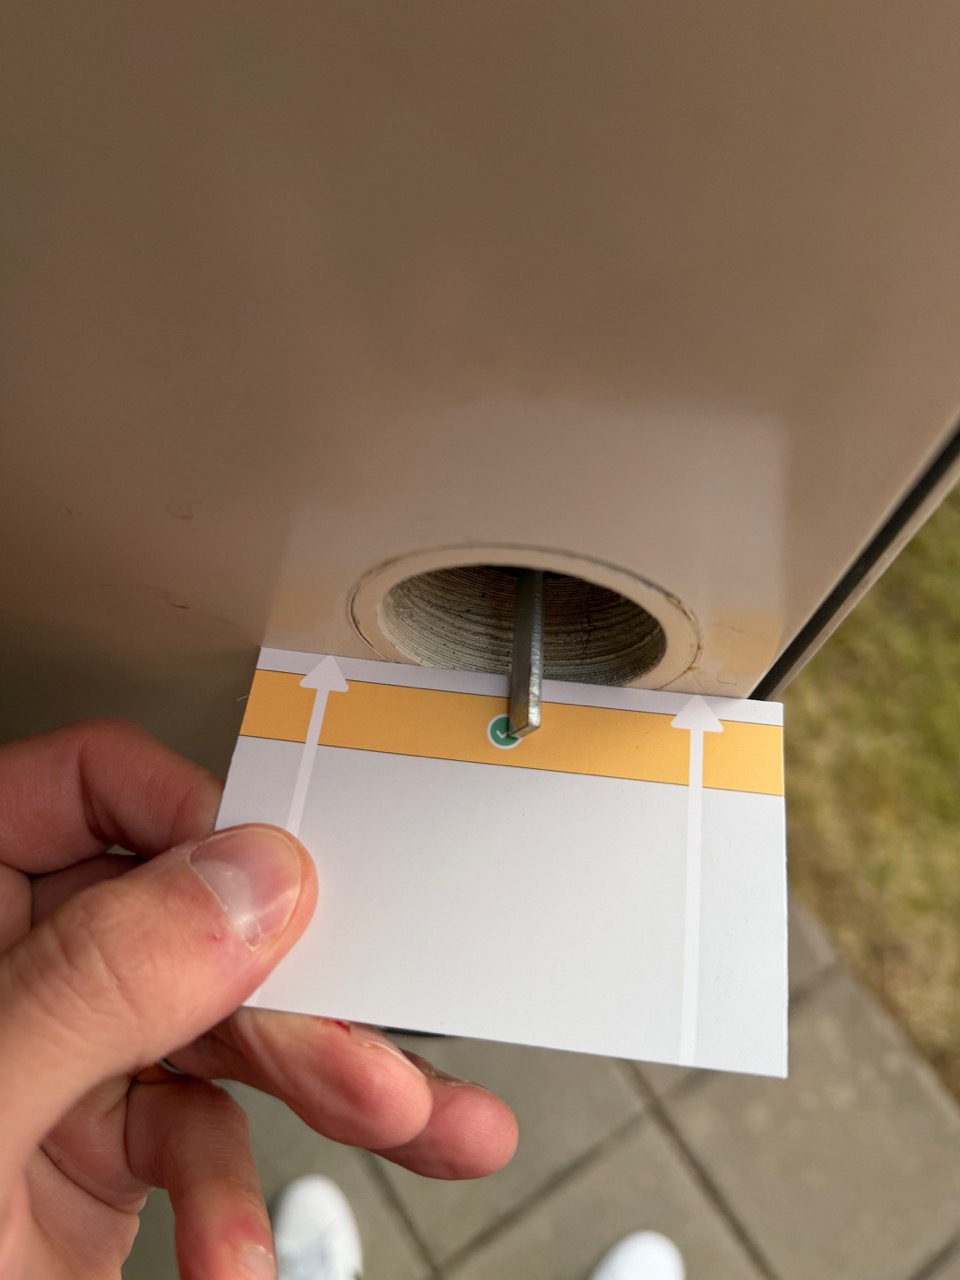
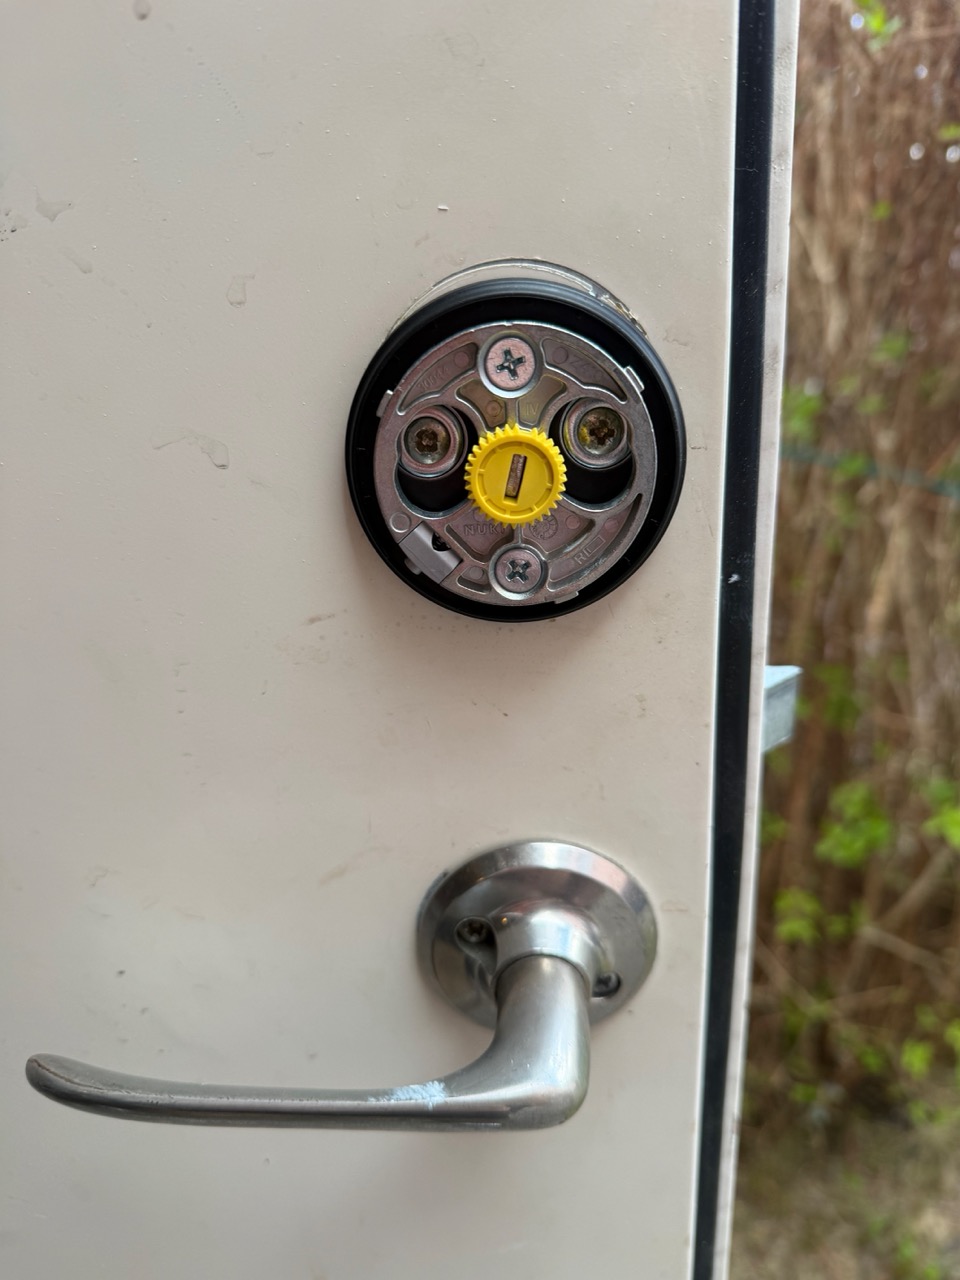
The measurement card is the one piece of the kit you'll wonder why it exists, then immediately appreciate. It tells you which of the three included tailpieces matches your cylinder depth. Pick the right one, screw it through the D-plate into the door, attach the mounting plate, drop the yellow adapter on, and you're ready for the Nuki disc.
Step 3: The Calibration Mistake (Don't Skip This)
This is where I made my one real mistake of the day. The Nuki disc clicks onto the mounting plate with a quarter-turn — it feels secure, and it usually is. But I hadn't seated the disc fully against the plate, and when calibration started and the motor began rotating to find the lock's min/max positions, the torque was enough to pop the lock off the plate. It fell.
Lucky for me, I'd left a thick blanket on the floor under the door during install (I do this for any work that involves dropping small screws). The Nuki landed on the blanket and survived without a scratch. If it had hit the tile, the story would be different — these things are precision machines with brushless motors and built-in batteries.
Before pressing "Start calibration," manually twist the Nuki disc both directions a few degrees to confirm it's fully locked onto the plate. If it wobbles or has any play, twist it back off and reseat it. Calibration applies real torque — anything loose will come off.
Once it was properly seated, calibration completed in about 15 seconds. The storage-room cylinder is a single-turn (360°) deadbolt, so the rotation is fast — well under a second to lock or unlock when I later set the speed to Insane.
Step 4: The Settings I Configured for the Storage Room
For an owner-only door that nobody locks from the inside, the defaults aren't optimal. Here's what I changed:
- Locking speed: Insane. Single-turn deadbolt + light mechanism + brushless motor = sub-second unlock. The Insane mode is genuinely fast for this kind of door
- Energy-saving mode: On. This door doesn't see daily traffic. Sleeping the radio between events extends battery life significantly
- Button + LED: Disabled. Nobody locks this door from the inside (you can't lock yourself in a storage room — there's no thumbturn anymore, the Nuki is the inside actuator). I don't need the indicator light, and disabling the side button avoids accidental triggers
- Auto-unlock (geofence): Off. I don't want this door auto-unlocking when I walk near the house
- Wi-Fi: Enabled (after adding a range extender — see below)
- Smart Hosting: Connected to Nuki Web. Even though guests don't access the storage room, I wanted central management for both locks. More on this in the next post (coming soon)
Step 5: The Wi-Fi Range Extender
The storage room sits in front of the house, two exterior walls between it and our main router. Signal there was marginal. I added a Wi-Fi range extender in the room itself, which solved it completely.
The Ultra Nordics has built-in Wi-Fi but it also supports Thread, which means a Thread border router (we have an Apple TV) can route mesh traffic to the lock via Thread instead of Wi-Fi. In practice, for this door, Wi-Fi was simpler, adding the extender took five minutes and stability has been perfect since. If you have Tele2, you can get a free range extender if you are subscribed to any plan above 600 Mbps.
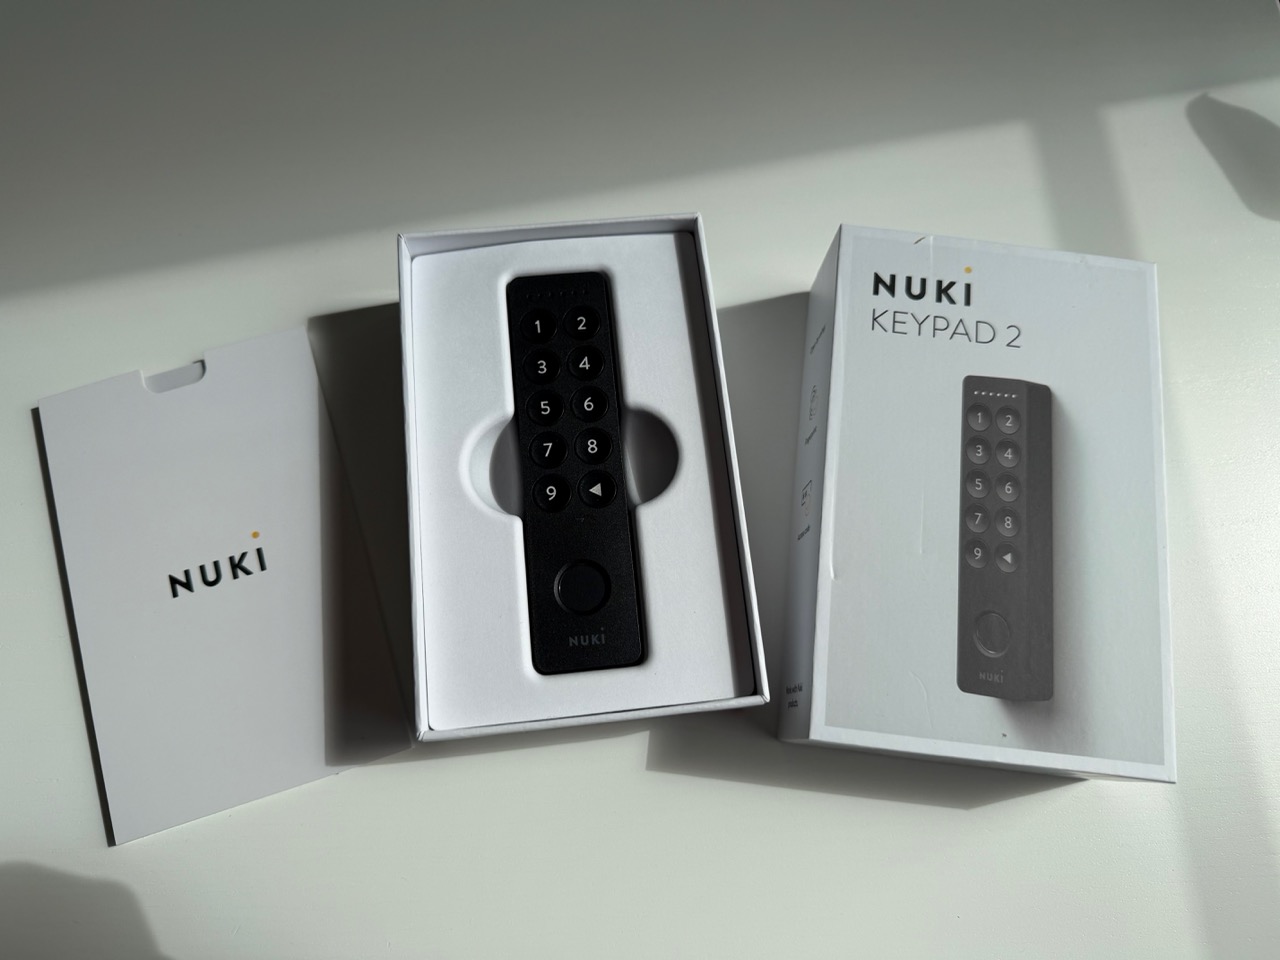
Step 6: The NFC Keypad Install
Mounting the keypad outside is the easiest part of the entire process. I cleaned the doorframe with isopropyl alcohol, peeled the backing off the adhesive strip, pressed the keypad firmly in place for 30 seconds, and let it cure overnight.
The next morning I also added one screw through the keypad's mounting point as a backup. The adhesive is rated for outdoor Swedish conditions (-20°C, IP54), but the keypad gets handled dozens of times a day in normal use, and I'd rather not discover a year from now that the adhesive failed in a January thaw. The screw takes 60 seconds and provides peace of mind.
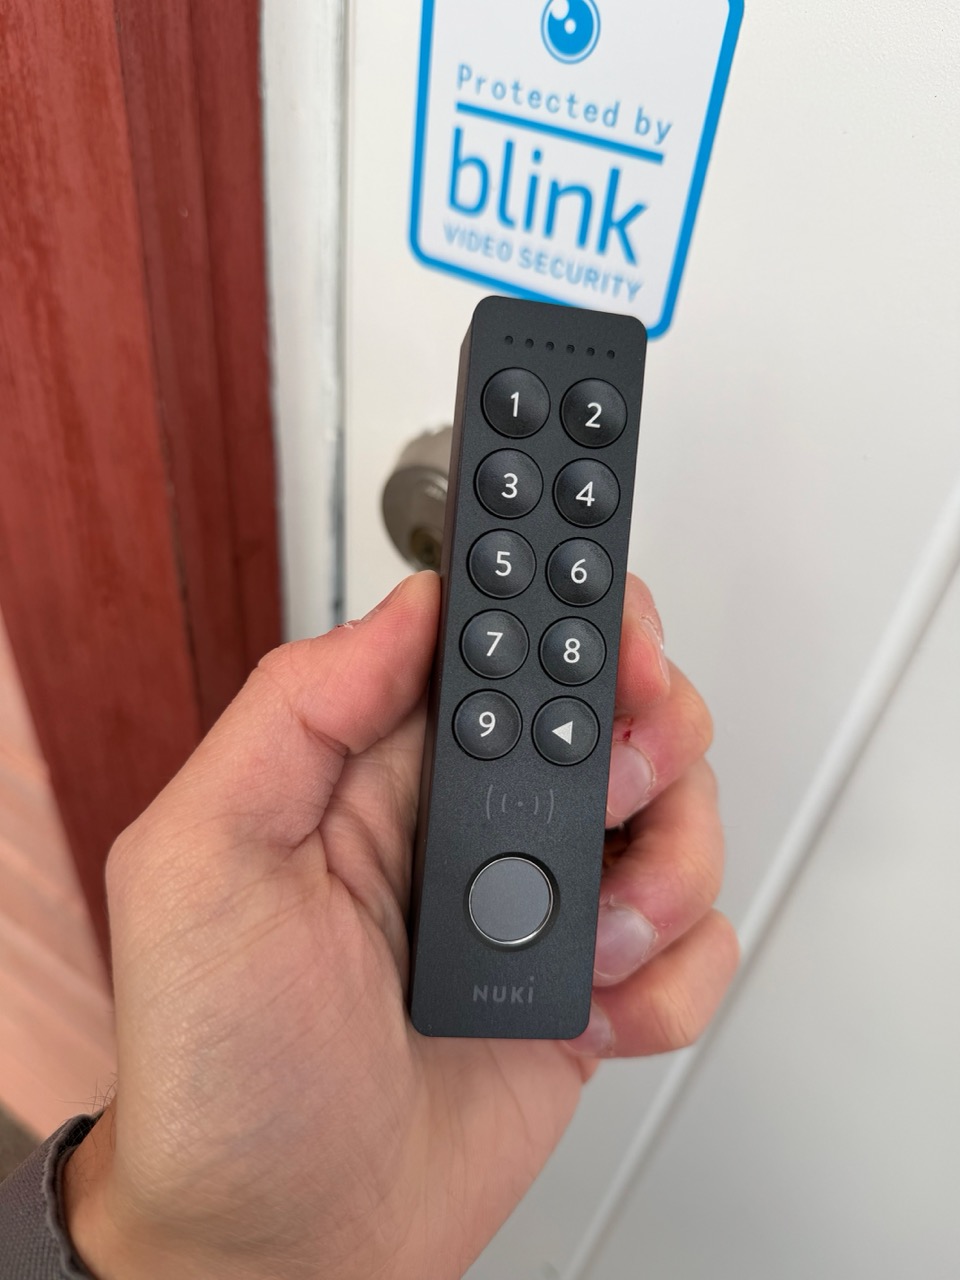
Pairing the keypad to the lock is a 20-second flow: open the app, "Add Keypad," hold the back-arrow key on the keypad for 5 seconds until the LEDs flash, and the app connects automatically. Add a fingerprint, set up a code, and you're done.
Total storage room install time: ~20 minutes. Including the calibration mishap.
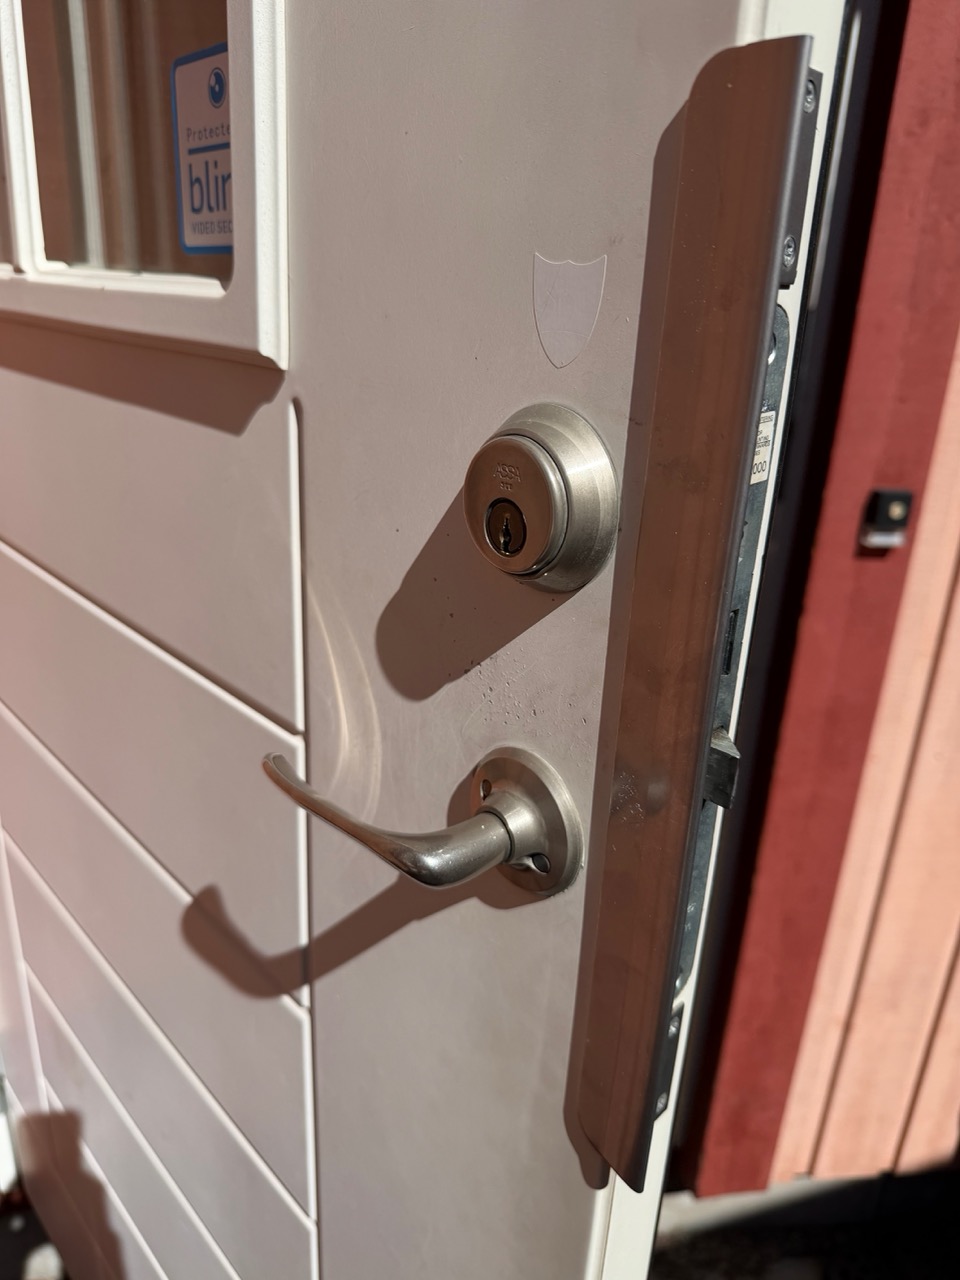
Front Door Install: The Hard One (~1.5 Hours)
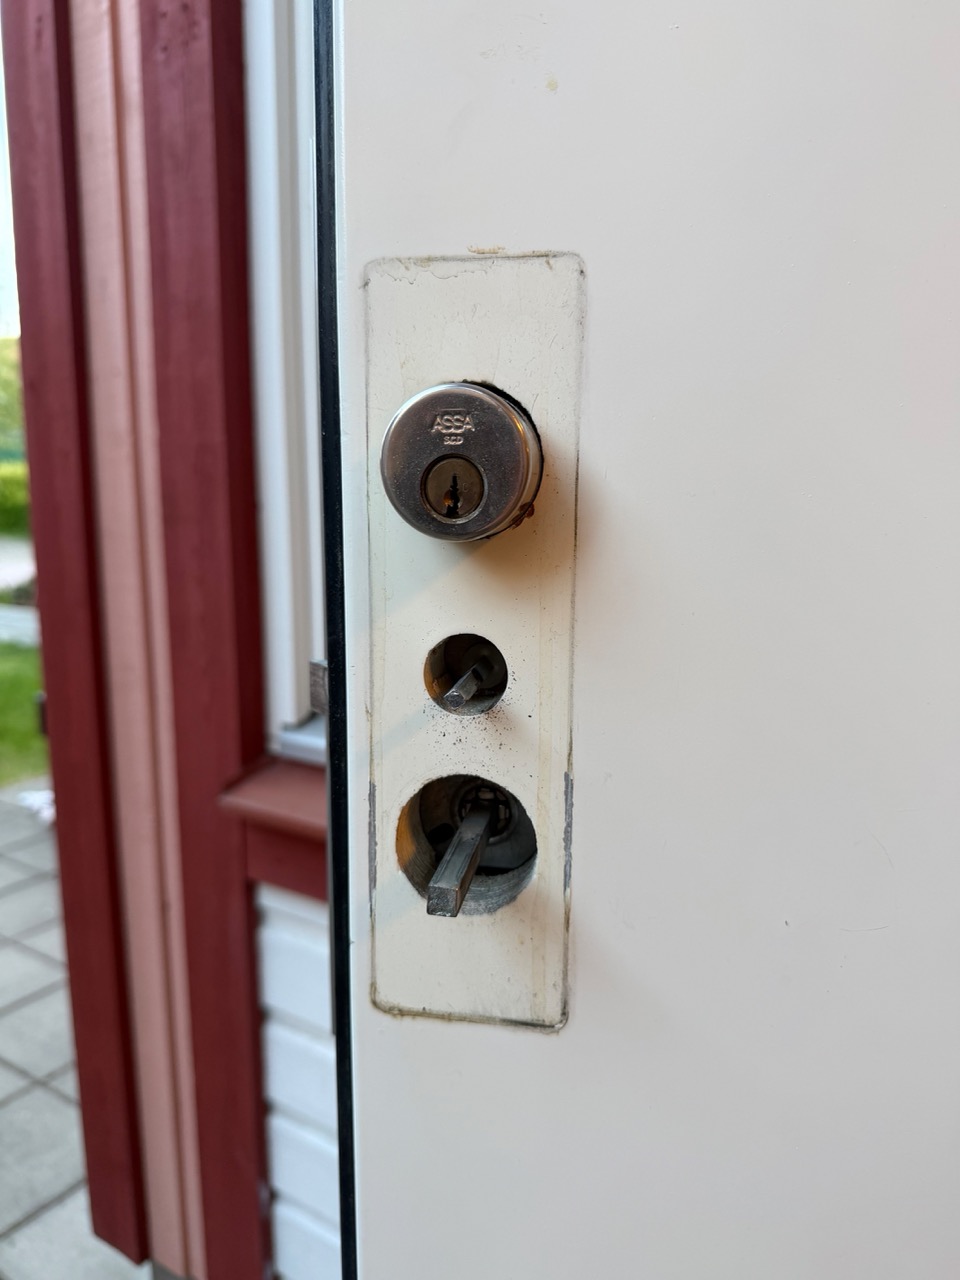
The front door is an Assa 2000 in a townhouse from the 2000s — and it's a much more complicated piece of hardware than the storage room. From the outside it looks like a standard single-cylinder oval Assa. From the inside, it has:
- A long double cylinder running through the door, with key access on both sides
- A centre deadbolt that locks independently via a thumbturn
- A lever handle that is mechanically independent of the deadbolt — turning the handle does nothing to retract the bolt, unlike on the storage door
That last point matters: because the handle is independent, the Nuki on this door can throw the deadbolt, but it cannot "open" the door (no Test Open Door function works here). You still have to turn the handle manually. That's a function of the door, not the lock.
Step 1: Read the App, Then Find the Video
The Nuki app's instructions work well for simple cylinders, but they don't go deep on the Assa 2000's specific quirks — particularly the safety retention pieces inside the cylinder that need to be aligned with the key in a particular position to release. I spent about 15 minutes stuck on the cylinder removal step.
What unstuck me was this YouTube video — a Swedish locksmith walking through exactly this lock and the exact problem I had:
The video shows that you need to insert the key, turn it to a specific angle to align an internal pin, then the cylinder will slide out cleanly. Without that step, you can pull as hard as you want and the cylinder is mechanically locked in place.
I also had a back-and-forth with ChatGPT to confirm my interpretation before applying force — for something this expensive and this central to your home's security, two sources are better than one.
Watch the video above before starting. The cylinder retention is not obvious from the parts diagram in the Nuki app, and forcing it will damage the cylinder. Five minutes of YouTube saves the install.
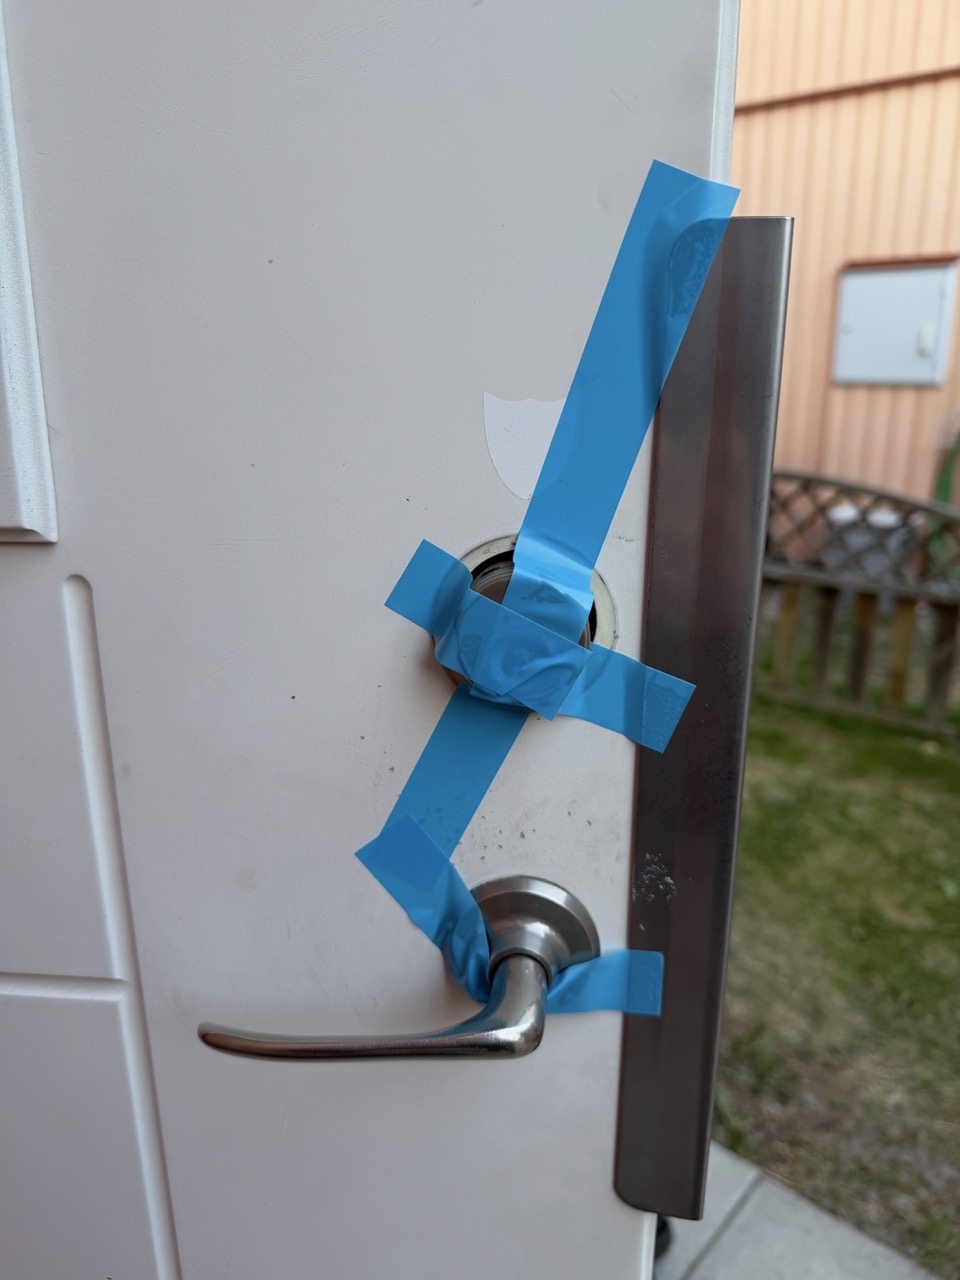
Step 2: Painter's Tape Trick (Again)
Same problem as the storage door — once you remove the interior plate, the exterior cylinder wants to fall outward. Same solution: painter's tape across the exterior in an X-pattern. This time you can really see why it's necessary, because the Assa 2000's double cylinder is heavier than the storage room's single cylinder, and the exterior face would absolutely hit the porch if released.
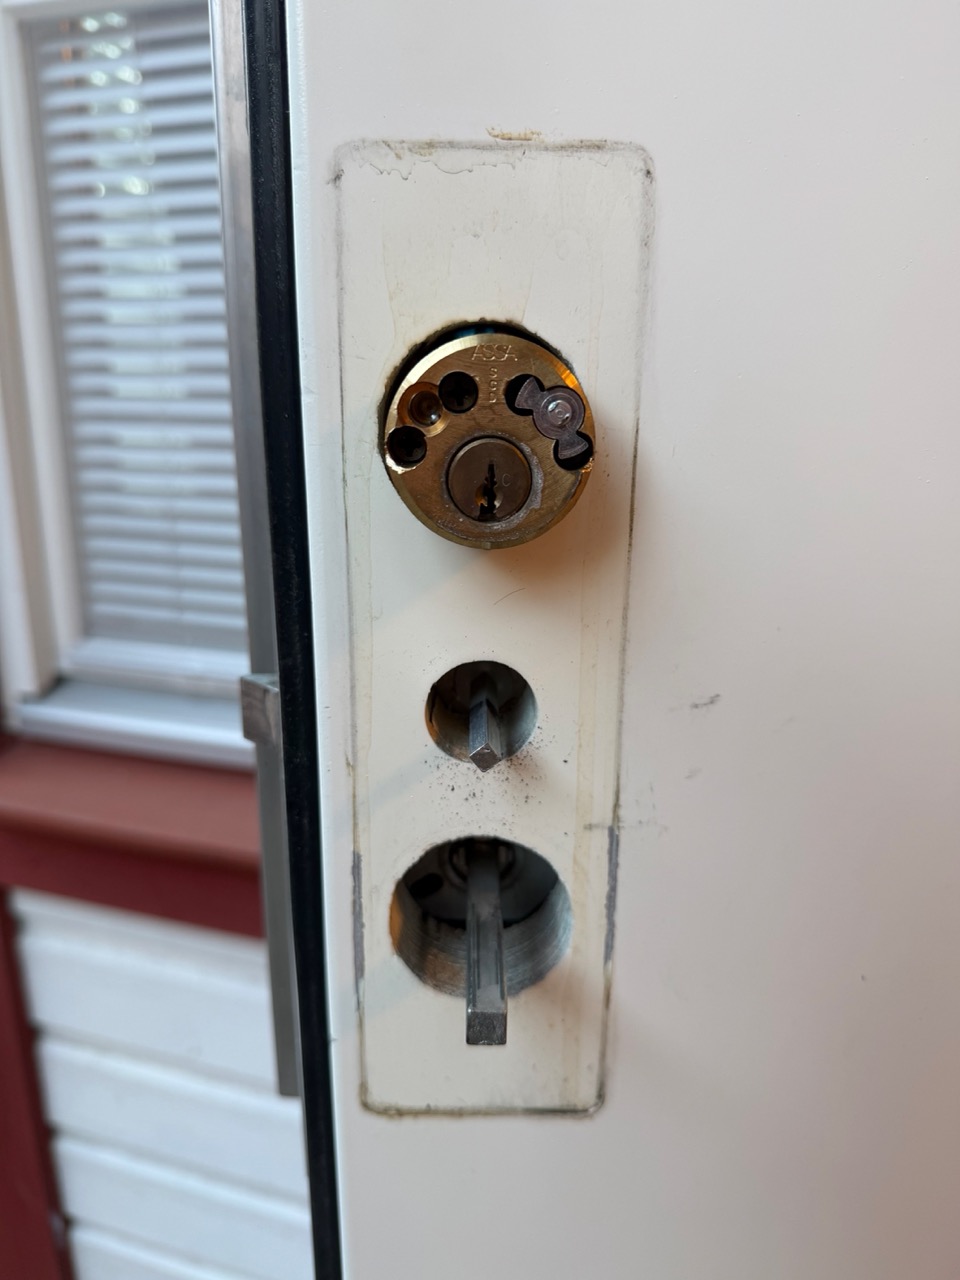
Step 3: The Three-Hole View
Once the interior plate is off, you get the dissected view of an Assa 2000 — the cylinder hole at the top, the centre deadbolt mechanism in the middle, and the handle shaft at the bottom. This is also the moment to take stock of what condition the lock is in, because you'll never see this view again.
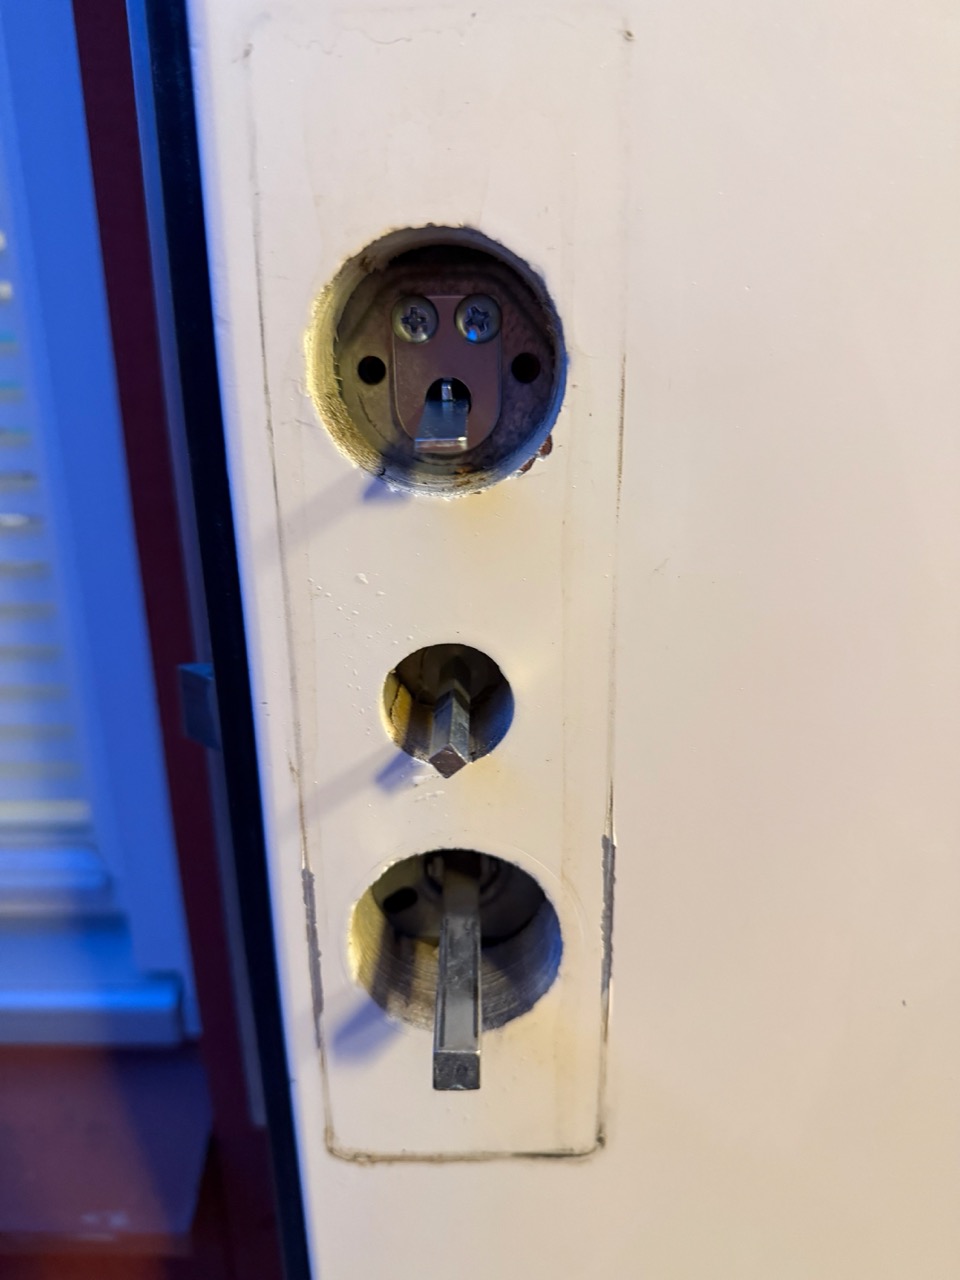
While I had everything apart, I took the opportunity to oil and clean every moving part of the mechanism — bolts, tailpiece, lever shaft. None of this had been touched since the house was built. It was overdue, and it made the post-install operation noticeably smoother.
Step 4: Tailpiece, Mounting Plate, Calibration
From here, the steps mirror the storage room install:

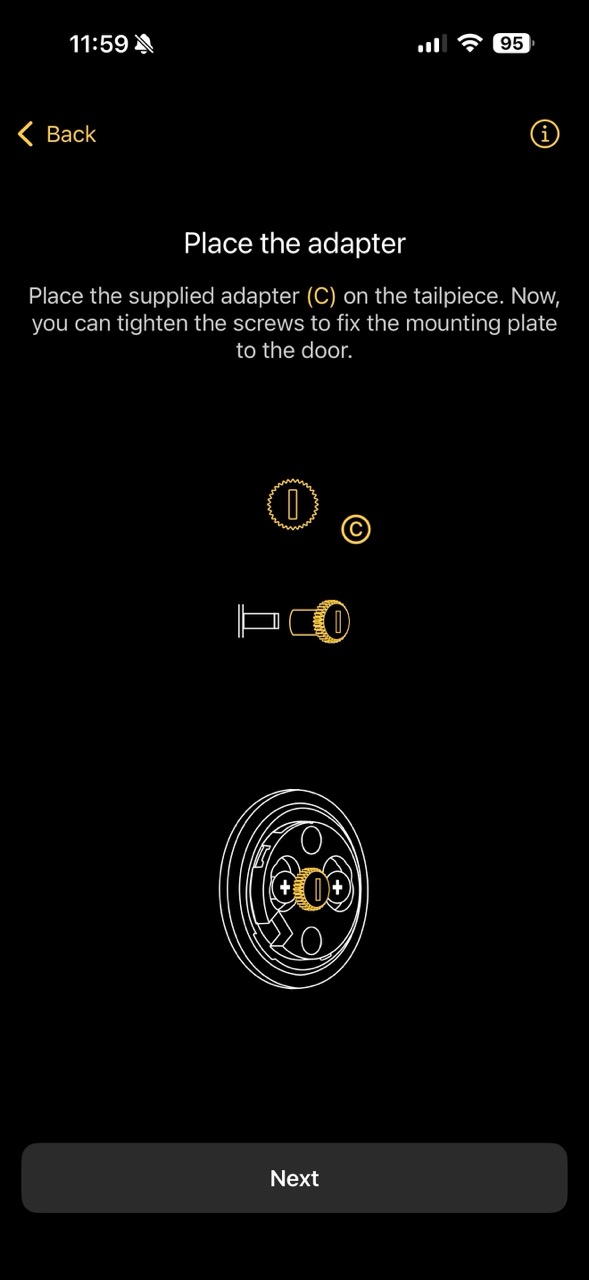
Picked the right tailpiece using the measurement card, screwed it in with the D-plate, attached the mounting plate, placed the adapter. Where the storage door took 5 minutes for this sequence, the front door took 30 — partly because I was being extra careful, partly because the Assa 2000's tailpiece sits deeper and aligning it takes more patience.

Step 5: The 720° Discovery
Calibration started, and the motor began rotating to find the min/max positions. After a few seconds it was clearly taking longer than the storage room calibration. Then it kept going. And going.
I realised what was happening: this is a double-turn (720°) lock. It takes two full rotations of the key to fully extend or retract the bolt — twice the work of the storage room's single-turn cylinder. The Nuki Ultra Nordics handles both, but a 720° rotation cycle obviously takes roughly twice as long.
Calibration succeeded. But when I first set the locking speed to Insane (matching what I'd done for the storage room), the lock struggled — the motor was being pushed too hard to complete two full rotations at maximum speed and it occasionally stalled mid-cycle.
I dropped it back to the default Standard speed, which gave the motor enough headroom to complete both rotations cleanly. Locking now takes about 3 seconds and unlocking about the same. It's not fast, but it's reliable, and reliable beats fast on a daily-use door.
Step 6: Settings I Configured for the Front Door
Different door, different use case, different settings:
- Locking speed: Standard (not Insane — see above)
- Button + LED: LED off (matches my storage room — I don't need a glowing dot on the inside of my door at night), but the side button enabled in "intelligent" mode. Pressing it locks or unlocks based on current state. Useful when you're walking out the door with your hands full
- Auto-unlock (geofence): Off for now. I want to test this more before relying on it
- Wi-Fi: Enabled. The main router is close enough to this door that signal is strong without an extender
- Smart Hosting: Connected. This is the door guests use, so it's the lock that benefits most from automated Airbnb code generation. Coming in the next post
Step 7: The Troubleshooting Trick
A few days in, I noticed the front door lock would occasionally throw an error when trying to lock or unlock, typically after the door had been opened and closed several times in quick succession. The lock's position tracking would drift slightly and it would refuse to actuate.
The fix that works 99% of the time:
- Open the door (the lock is under no load)
- Manually turn the smart lock disc with your fingers — left or right, doesn't matter, just rotate it once to reset its position sense
- Try the lock from the app again — it works
If that doesn't work (rare), recalibrating from the app fully resets the position tracking.
I also made one more change for this door: I stopped using the centre deadbolt entirely. The Assa 2000's middle thumbturn deadbolt is a separate mechanism from the main cylinder, and on a door with a smart lock automating the main cylinder, throwing a second bolt manually can confuse the Nuki's position tracking and increase the rate of those occasional errors. The main cylinder bolt is already a Class 3-equivalent security feature on its own. I haven't lost any sleep about it.
Total front door install time: ~1.5 hours, including the time spent stuck on cylinder removal, watching the YouTube video, oiling the mechanism, and the calibration speed adjustment.
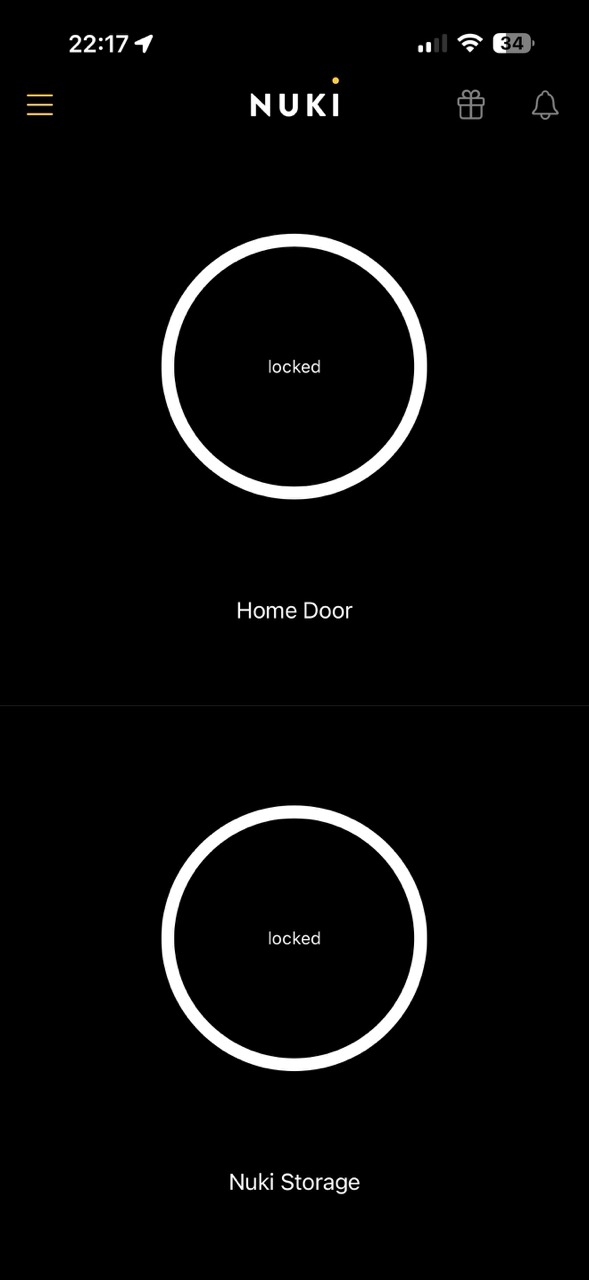
App View: Two Locks, One House
The payoff of doing two installs in one weekend is that the Nuki app now shows both locks in one view, both reporting "locked" most of the time, both controllable from anywhere I have signal:
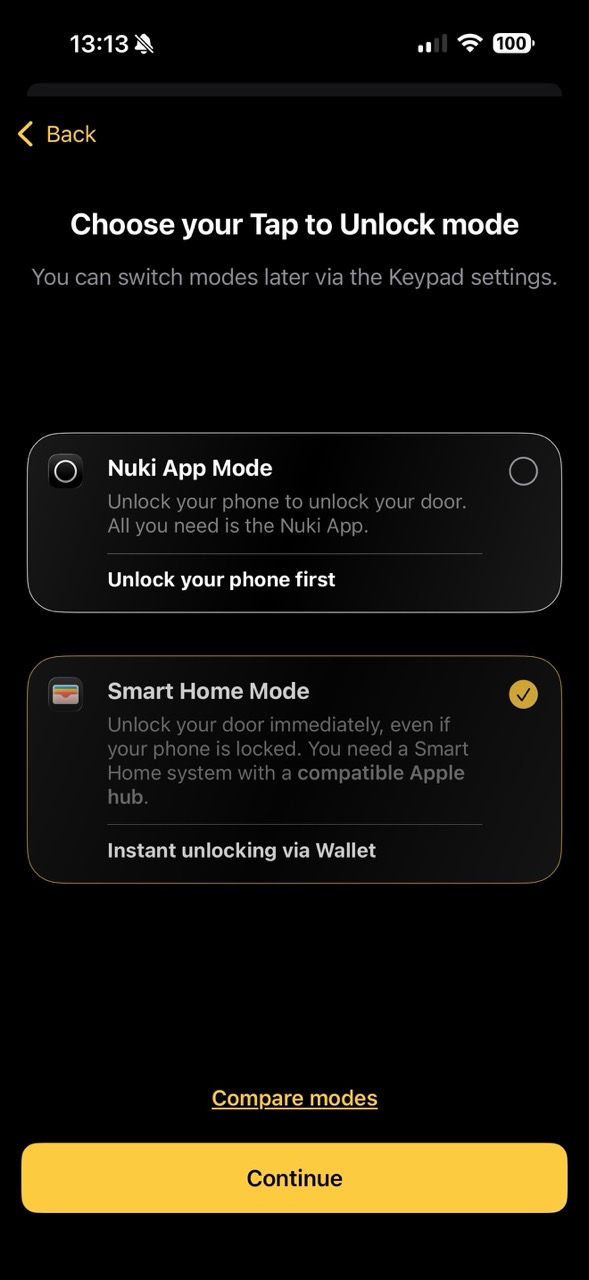
For Smart Home Mode (the Apple Wallet tap-to-unlock flow), the app gives you a clear choice between routing through the Nuki app or through your Wallet + Matter hub. I set up the storage room's NFC keypad in Smart Home Mode because we have an Apple TV acting as our Thread/Matter hub already:
Charging and Maintenance
The internal lithium polymer battery is a real upgrade over the AAA-powered competition. Charging is genuinely painless:
- Option A: Charge in place. A small power bank, the magnetic USB-C cable that comes in the box, plug it in for two hours. You can keep using the door normally — the lock works while charging
- Option B: Unmount and charge on a counter. Twist the disc counter-clockwise off the mounting plate (30 seconds), bring it inside, charge it next to your phone, twist it back on. The mounting plate stays on the door so re-mounting is instant
I've done both. For the storage room I prefer in-place charging because the door is closer to a wall outlet. For the front door I prefer unmounting — it's at the front of the house, which means no convenient outlet, and bringing the lock inside also gives me a chance to wipe it down.
What I'd Do Differently
Some of my notes while installing/key learnings:
- I'd start with the YouTube video on the front door, not the app. The Nuki app is great for simple doors but doesn't have the depth on specific Swedish lock models. Five minutes of locksmith video saves real time
- I'd add the Wi-Fi extender to the storage room before starting, not as a reactive fix. If you have a remote door, plan for the signal
- I'd mount the keypad with both adhesive and a screw from the start, instead of doing the screw as a follow-up. The adhesive alone probably works, but the keypad sees enough handling that belt-and-suspenders is worth the extra minute
- I'd choose the lock speed to match the lock type from day one — Insane for 360°, Standard for 720°. The default of Standard works for both, but Insane on a 720° lock will frustrate you
The Verdict
It works great. Both locks work. The fundamental promise — retrofit a smart lock onto a Swedish Assa cylinder without drilling, keep the original key, get app + keypad + tap-to-unlock control — is fully delivered. The Ultra Nordics is the first smart lock I've used that feels designed for our doors rather than adapted to them.
The two-configuration approach (regular Keypad on the front door, NFC Keypad on the storage room) is the right call for any home that mixes guest access with owner-only spaces. If you're considering one Nuki, consider whether you have a second door where the NFC keypad would earn its place.
Next post I'll walk through the Nuki Smart Hosting flow — how I connected the front door lock to Airbnb via the Nuki Web API, how guest codes are generated automatically when bookings come in, and the full setup from buying the subscription to issuing your first code. That's where this smart lock pays for itself if you do any short-term rental hosting.
In the meantime, you can run the compatibility check on your own door and see the full Ultra Nordics product range at nuki.io.
People Also Ask (FAQ)
Does the Nuki Ultra Nordics replace my original key?
No. This is the single best thing about it. The Nuki sits on top of your existing cylinder on the inside of the door. Your physical key keeps working from the outside, exactly as before. It's a true retrofit — if you ever uninstall the lock, the door is unchanged.
How long does the Nuki Ultra Nordics install take?
Around 20 minutes on a simple single-deadbolt door (my storage room), and around 1.5 hours on a complex Assa 2000 with a double cylinder and centre deadbolt (my front door). The complexity of your specific lock matters far more than the Nuki side of the install, which is genuinely fast.
What's the difference between a 360° and a 720° lock during Nuki calibration?
A 360° lock (single-turn) extends the deadbolt in one full rotation. A 720° lock (double-turn) needs two full rotations to fully extend. The Nuki Ultra Nordics auto-detects which one it's on during calibration — but the 720° rotation takes longer, so you may need to drop the locking speed from Insane back to Standard for double-turn locks.
Should I get the NFC Keypad or the regular Keypad 2?
For a door used by guests (Airbnb, friends, cleaners), the regular Keypad 2 is fine — they'll use codes anyway. For an owner-only door (storage, garage, your own front door if you don't host), the Keypad 2 NFC adds Tap-to-Unlock with Apple Wallet / Apple Watch / Samsung Wallet, which is the fastest way to open a door without touching anything but your wrist.
What if the Nuki gets stuck and won't lock or unlock?
Open the door, turn the smart lock manually left or right to reset its position, then try again. That fixes it 99% of the time. If not, recalibrate from the app. On my complex front door, I also stopped using the centre deadbolt entirely — it was confusing the lock's position tracking.
Do I need a Wi-Fi extender for the Nuki to work reliably?
Not always, but I added one for my storage room because it sits behind exterior walls and the main router signal was marginal. The lock works on Bluetooth and Thread without Wi-Fi, but for remote access and Nuki Web (Smart Hosting), a stable Wi-Fi or Thread connection matters.
How do I charge the Nuki Ultra Nordics?
Two options. Either unmount the lock (takes 30 seconds — twist counter-clockwise off the mounting plate) and charge it on a counter via the magnetic USB-C cable, or charge it in place using a power bank. Full charge takes about 2 hours. Battery lasts up to 12 months on Bluetooth/Thread, around 6 months with built-in Wi-Fi active.
This post is in partnership with Nuki. The install experience, mistakes, and configurations are entirely my own.